
Here's how to assign one import to multiple users:
Step 1: Format user data in your spreadsheet into a single column.
- Make sure that your file has a single column that lists the appropriate user. Each contact or company can only be assigned to a single user.
Step 2: Add a custom field for the user column data.
- Mouse over "Settings" and select "Custom fields" in the menu.
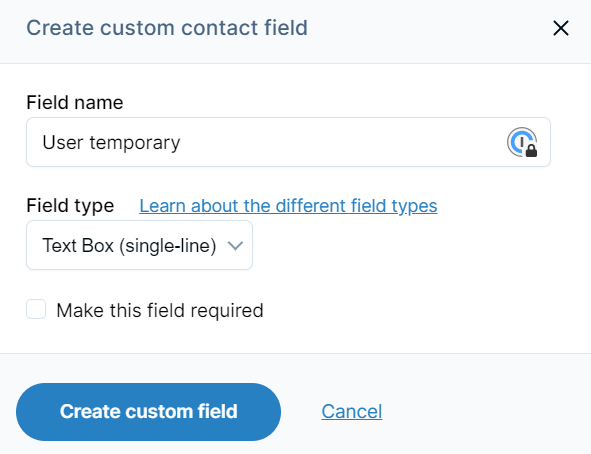
- Select Contacts, and then choose "Create new custom field." Name the field something that makes sense to you, and keep in mind that you’ll delete this field later.
- Repeat that process to create a custom field on company records, being sure to use the exact same field name.
Step 3: Import your spreadsheet, being sure to match your user data column to your custom fields.
- Mouse over "Add" and select "Import contacts" in the menu.
- Select the "Import a spreadsheet" option to upload your file, and then follow the prompts. Learn more about running an import here.
- During the final step of the import, be sure to map your user column to both contact and company records, using the custom field you created earlier.
Step 4: Filter by your user custom fields and bulk assign records to the appropriate user in the CRM.
- Go to your Contact list. Select "Add a filter" in the “Sort and filter” section on the left.
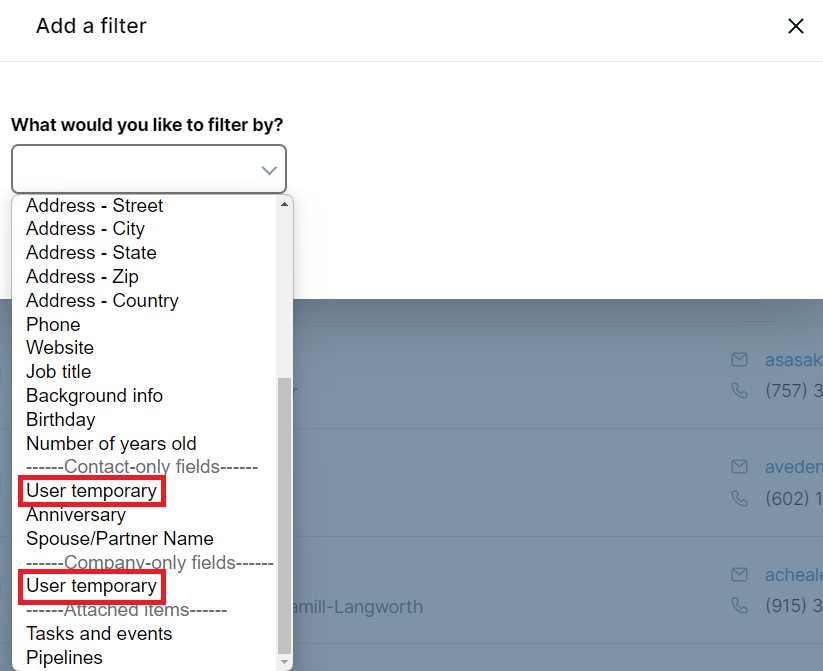
- Select your custom field under the “Contact-only fields” section, and then type in one user name - spell it exactly the same way it appears in your file. Apply the filter.
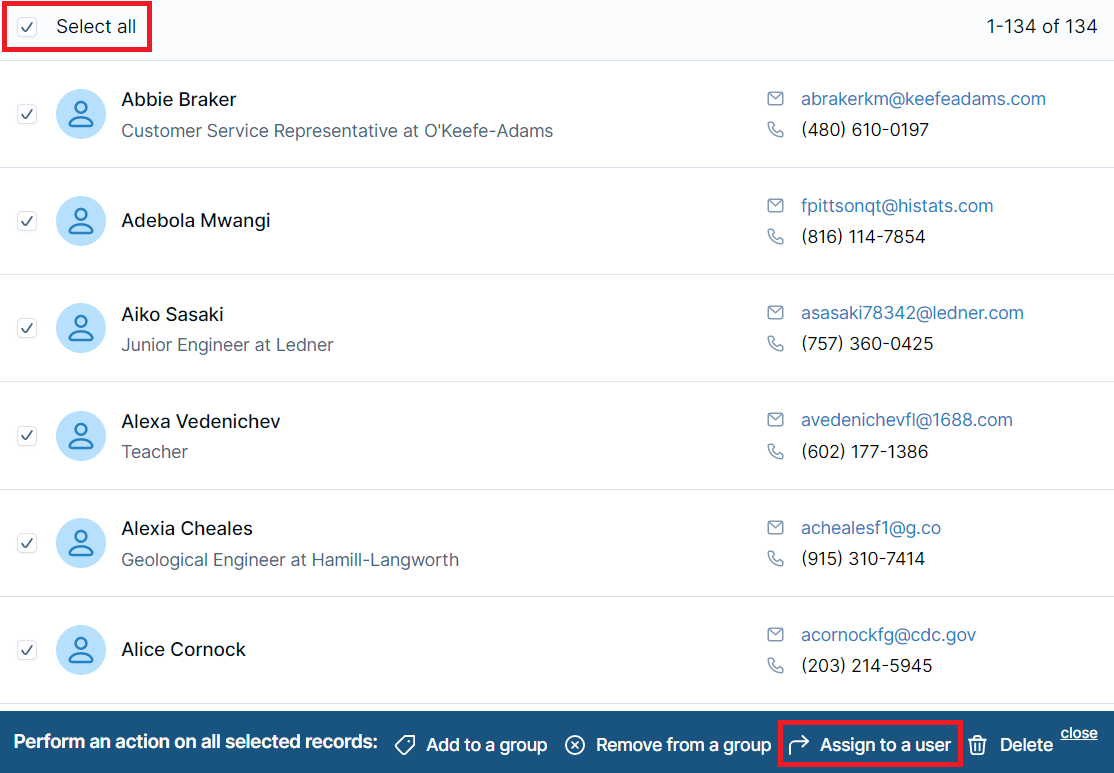
- Tick the "Select all" box in the upper left. If you have over 500 contacts, you'll also need to click the link to select them all.
- Choose "Assign to a user" in the bar that appears at the bottom of the page, and then select the appropriate group or create a new one.
- Select “Add a filter” in the “Sort and filter” section again. This time, select your custom field under the “Company-only fields” section.
- Enter the same user name, spelling it exactly the same way it appears in your file. Apply the filter, tick the “Select all” box, and then choose “Assign to a user.”
- Repeat this process for each additional user, being sure to reassign both contact and company records.
Only need to assign the import to a single user? Learn how to assign the entire import to one user here.
Step 1: Format user data in your spreadsheet.
In order to import the group data properly, you'll need to format the file so you have a single “User” column. That single column should have the appropriate user name for the corresponding contact. Each contact or company can only be assigned to a single user.
Learn more about formatting your file for import here.
Step 2: Add custom fields to import user data.
Once your file is ready for import, create custom fields to bring in your user data. These are temporary fields that we’ll use to filter contacts and assign them to users, but after that’s done they can be deleted. One important note here is that you’ll need to create two custom fields, one for contacts and one for companies.
Please note: only admins can add custom fields. If you don’t see an option to add custom fields you’ll need to contact an admin on your account.
Mouse over “Settings” in the navigation bar, and then select “Custom fields.” On the next page, select “Contacts.” Then, select “Create a new custom field” and enter a name like “User temporary.” Repeat that process for “Companies,” being sure to use the exact same field name.
Step 3: Import the file.
Once the custom fields have been added, you can begin the import process. Mouse over “Add” and select “Import contacts” in the menu. Then, select “Import a spreadsheet” near the top of the page, and choose the file from your computer.
After the file is uploaded, you’ll be prompted through a few questions regarding data in your account. Learn more about running an import here.
During the final step of the importing process, you’ll need to select to import your user data column to both contacts and companies. Then, match your user column to the custom field you added earlier.

Step 4: Filter and assign contacts to users.
Now that the data is imported, your user names are saved in a custom field but they aren't assigned to those users in the CRM just yet. To reassign the contacts to a user, you’ll need to use a filter to pull up everyone with a particular user entry, and then bulk assign them to that user.
Go to your Contact list, and select "Add a filter" in the “Sort and filter” section on the left. Under “What would you like to filter by?” select the “User temporary” custom field you added earlier under the “Contact-only fields” section.
Once you’ve selected the custom field, enter the name of one of the users from your file. Spelling is important here, so be sure to type it out exactly the same way it appears in your file!
When you apply the filter, it’ll pull up a list of all contacts with that entry in the user custom field. Then, tick “Select all” in the upper left.
Please note: if you have over 500 contacts or companies, you'll need to click the link in the red bar to select them all.
Next, choose “Assign to a user” in the bar near the bottom of the page, and select the appropriate user name.
Then, return to your Contact list, and select "Add a filter" in the “Sort and filter” section on the left. Under “What would you like to filter by?” select the “User temporary” custom field you added earlier under the “Company-only fields” section.
Once you’ve selected the custom field, enter the name of the same user from your file. Spelling is important here, so be sure to type it out exactly the same way it appears in your file!
When you apply the filter, it’ll pull up a list of all contacts with that entry in the user custom field. Then, tick “Select all” in the upper left.
Please note: if you have over 500 contacts or companies, you'll need to click the link in the red bar to select them all.
Next, choose “Assign to a user” in the bar near the bottom of the page, and select the appropriate user name.
Repeat this entire process for each additional user, being sure to run each filter twice (once for contacts, once for companies). After you’ve assigned everyone appropriately, you can return to the Custom fields Settings page to delete the user custom field.
Can't find what you're looking for?