
One of the most frustrating aspects of running Less Annoying CRM (and, I'd imagine, just about any website) is outgoing email. We try to be conservative about email and only send those that are essential (login info, etc) or requested (specific feature updates), but proving to the world that we try to be good email citizens is a non-trivial task. Due to the abundance of spam and the like, you have to jump through a number of hoops to prove your identity and, eventually, that you're sending legit mail. And due to the fact that email runs on ancient protocols, jumping through those hoops can be a bit of a chore.
Happily, there are a growing number of interfaces one can use to simplify this process including SendGrid, Mailgun, and Amazon Simple Email Service (SES). We recently made the switch to SES, primarily because we already use Amazon Web Services (AWS) for all our web hosting. We made the full switch to SES a couple months ago and so far it's been great compared to our old manual SMTP approach both in terms of deliverability and providing basic reporting on bounces, rejects, and the like.
That said, getting SES set up wasn't exactly a walk in the park especially in conjunction with all the authentication mechanisms needed to ensure high delivery rates. So in the hopes that I can make the whole process a little easier for someone else trying to accomplish the same, here's a description of how we got everything set up. I'm sure it's not the only way to do it, and it's probably not the best way either, but it's working for us, so here goes.
Overview
There are two basic steps to the process that we followed, each with a number of tweaks to get them working. The first is to set up our Amazon SES account, and to add DNS records marking Amazon as a verified sender. We next installed PHPMailer on our server to send mail through SES, which required a few tweaks to get all of the verification working.
Amazon SES
The first step in the process is signing up for and requesting production access from SES. You'll need an AWS account to get started, and then you can add the SES service.
Once it looks like your test emails are working, you'll need to request production access from Amazon. This is basically telling Amazon that you're actually going to start using the service for real purposes (and not just testing). Annoyingly, Amazon quotes a one-day processing time but at least in our case never sent any confirmation; it just started working eventually.
Finally, you'll need to register each outgoing email address or domain name from which you plan to send mail. Again, this can be done from the SES panel in the AWS management page. One thing to keep in mind is that the email addresses are case sensitive, so make sure you verify any alternative capitalizations you might use. For example, I had to verify bracken@lessannoyingcrm.com as well as Bracken@lessannoyingcrm.com. After verifying an email address, you can use the "Send Test Email" link to do just that. Assuming you receive the email, your SES account is good to go.
Authentication
If you've been following along so far, you may have noticed something a little annoying about the test email that you received from Amazon. At least if you're using GMail, the email message will have your sending address, but it also has a little "via" message showing that it was sent through Amazon.
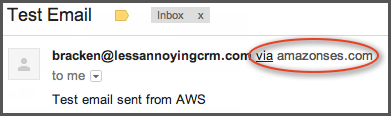
When we were setting things up, this message was even worse as Amazon's DNS registered it as email-bounces.amazon.com, so we were really eager to get rid of it. Even still, getting rid of the via section was important to us to make sure that the email looked as professional as possible (and to make it clear that it was coming from us and not Amazon).
The key to getting rid of this message (and to improve the overall deliverability of our mail) is proving our identity to Google (and other email hosts), such that they don't feel compelled to indicate the source of the email. Amazon recommends three different forms of verification, all of which involve adding DNS records to demonstrate your ownership of the domain from which your email is sent: SPF, SenderId, and DKIM
SPF and SenderId
Setting up SPF and SenderId is pretty straight forward, and basically consists of adding a DNS record indicating that Amazon's servers should be seen as a trusted source for your domain. If you send mail from other locations (e.g. Google if you use Google Apps), you'll also want to add them as verified senders. Amazon describes the procedure for SPF and SenderId in the SES docs. Adding a DNS record will vary based upon your provider, but all of them should enable you to add an appropriate TXT record for each (or to append the required information if the records already exist).
After setting these up, when an email host receives a message claiming to come from your domain, it will compare its origin to the DNS records to ensure that the sender is an expected source.
DKIM
DomainKeys Identified Mail (DKIM) is the third recommended verification step, and, at least in our case, it was required to get rid of the "via" link on messages sent to GMail. Whereas SPF and SenderId merely state publicly that emails may come from a particular source (e.g. Amazon), DKIM let's you explicitly sign each outgoing message to prove that you sent it. This signature is combined with a public key (stored in your DNS record) to verify that the email was sent by you. As such, DKIM is a much more robust way of demonstrating identity, but it also requires a little more setup.
The Amazon docs are pretty sparse in their description of DKIM, and the official specifications were a little too far in the opposite direction. Eventually, I was able to find this resource for creating a keypair to use with DKIM and PHPMailer (which I'll be using down the line). The tool returns a public key, which will be placed in your DNS records, and a private key which will be kept on your server to sign outgoing mail.
I followed the instructions from the tool to add the public key to a new TXT DNS record that looked like this for us:
- Name: phpmailer._domainkey
- Type: TXT
- Value: “v=DKIM1; k=rsa; g=*; s=email; h=sha1; t=s; p=MIGfMA0GCSqGSIb3DQEBAQUAA4GNADCBiQKB
gQDW+5BvWqWiSpEBnAy3mCLYhRoPmJOdM7kTtG
Q4wFkYmb5q2w+dqYZ2VHCz/h82Ue9zRhD3rXd0dv
l5Ml/+K6ql49rCjXsQ1XdmaoJP29XQhcBXvlZRraWQn
klO3GGDeHc812x08pq7V8ecn8ig8JLQ4VLJLyODQ6g
glLh+eRk7IwIDAQAB;”
After saving the record, I noticed that the end of the key was cut off on the Dreamhost panel (no, I'm not sure why we're still using Dreamhost). After poking around a bit, it seemed that the key value was just a little too long for Dreamhost, so I deleted the "s=email" section, which cleared up the problem. I'm sure there are other places to generate shorter keys, but this quick fix worked for our purposes.
As with all things DNS, after the changes were saved, it takes a while for them to propagate. To keep an eye on things, if you have a *NIX-based terminal, you can confirm the record by typing:
dig phpmailer._domainkey.lessannoyingcrm.com TXT
If things are working correctly, you should see the value that you entered into DNS returned in the terminal. Alternatively, you can use this page to check that the DNS record is in place, using "phpmailer" as the selector, and your domain name. In our case, after fixing the Dreamhost truncation, everything checked out on the DNS side.
Putting it together with PHPMailer
With everything taken care of for getting Amazon SES and the various authentication methods set up, there's only one thing left: actually sending an email. As alluded to above, our site is all written in PHP, so we chose to use a modified version of PHPMailer which includes SES support. With the package in place, I sent a test email using the following code (obviously, you'll need to fill in the passphrase, key, and secret) :
require_once('class.phpmailer.php');
$mail = new phpmailer;
// DKIM sign
$mail->DKIM_domain = 'lessannoyingcrm.com';
$mail->DKIM_private = '/path/to/.htkeyprivate';
$mail->DKIM_selector = 'phpmailer';
$mail->DKIM_passphrase = < passphrase >;
// Set mailer to use AmazonSES.
$mail->IsAmazonSES();
// Set AWSAccessKeyId and AWSSecretKey provided by amazon.
$mail->AddAmazonSESKey(< KEY >, < SECRET >);
// "From" must be a verified address.
$mail->From = $From;
$mail->FromName = $FromName;
$mail->AddAddress($To, $ToName);
$mail->Subject = $Subject;
$mail->Body = $Body;
$mail->Send(); // send message
While this script did work, a few tweaks were needed when we tried sending HTML emails and UTF-8 encoded messages, as suggested in the comments section of the PHPMailer page. The first addressed the HTML problem, and was near the end of the DKIM_BodyC function in class.phpmailer.php:
// Replace all initial whitespaces with one single space
// and remove ending white space
$replaced = 0;
do {
$body = str_replace(
array("\t", " ", " \r\n"),
array(" ", " ", "\r\n"),
$body, $replaced);
} while($replaced > 0);
return $body;
The second fix was to enable UTF-8 support, and was a small change to the DKIM_Add function:
$subject_header =
"Subject: " .
$this->EncodeHeader($this->SecureHeader($subject));
With these two fixes in place, I was able to replace the last part of my test script from above with the following:
$mail->From = $From;
$mail->FromName = $FromName;
$mail->AddAddress($To, $ToName);
$mail->Subject = $Subject;
$mail->IsHTML(true);
$mail->CharSet="utf-8";
$mail->Body = $Header.$Body.$Footer;
$mail->AltBody=$Body;
and everything has been going smoothly ever since. To check if your setup is all working, I'd recommend using this tool which gives you a unique email address to which you send a test message. The tool will then check the DKIM signing to make sure everything is working.
Anyway, sorry for the rambling post, but hopefully it will have been of some use in getting DKIM, Amazon SES, and PHPMailer to place nice together.
Sign up to receive updates in your inbox