
This guide will walk you through the steps to have your iPhone sync with Google, especially if you aren't using Google Apps for Business.
If you do use Google Apps for Business, we have an article coming shortly which will cover using that!
Syncing Gmail and Calendar
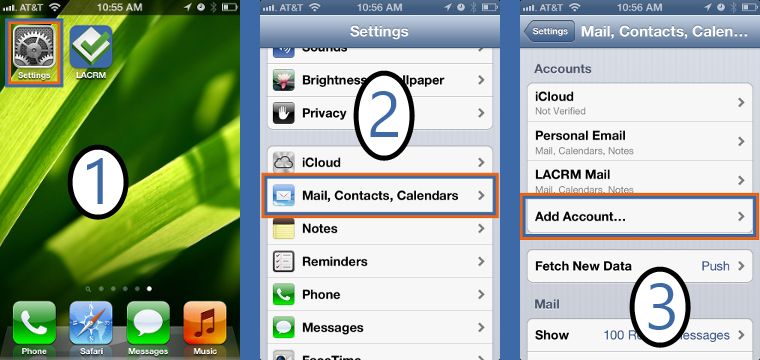
1. Open Settings on your iPhone. This should be an app on your home screen
2. From this settings menu, locate and open Mail, Contact, Calendars
3. On this page select Add Account...
4. Choose Gmail from this list, it should be the 3rd item
5. Here is where we will enter the account info. I'll walk you should enter in each field:
Name - This is the name that you want the system to refer to you by. So I would recommend entering your name here.
Email - Enter your email address, ending in "@gmail.com"
Password - Enter the password to your Google Account
If you're using Google's 2-step verification, you'll have to enter an application-specific password here instead of your normal password.
Description - This is the name the phone will use to refer to the account, so if you will sync more than one account, use something identifying here.
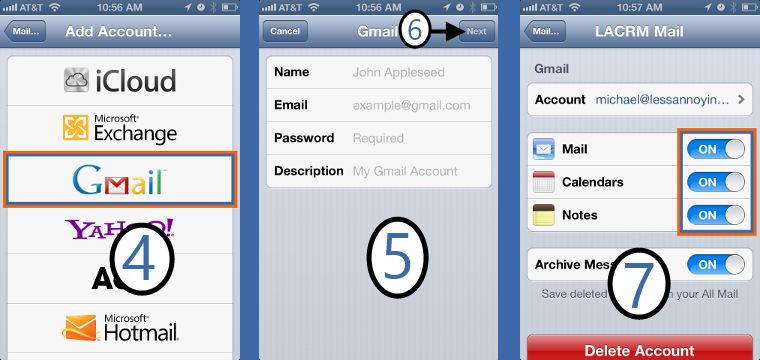
6. You're nearly done! Press Next
7. On this screen, choose which services you want to sync. Likely you'll want to sync Mail and Calendar. Then press Save.
If you choose to sync Notes, then when you take notes on your iPhone they will be emailed to you, so you may access them anywhere. This is an option if you want it.
That's it. Your mail and calendar are synced!
Now, onto Contacts, which works a little differently:
1. Open Settings on your iPhone. This should be an app on your home screen
2. From this settings menu, locate and open Mail, Contact, Calendars
3. On this page select Add Account...
4. At the bottom of this list, choose Other
5. Choose to Add CardDAV Account
6. On this page we'll enter a bit of account info, as follows:
Server - Type "google.com"
User Name - In this field put your Google or Google Apps email address (including the @gmail.com or the @yourdomain.com part)
Password - Enter the password for your account
If you're using 2-step verification on your account, you'll have to enter your application-specific password instead of your normal password.
Description - This is how these contacts will be identified, so something like "Google Contacts" or "Personal Contacts" should work
7. Select Next and be sure that on the next page Contacts is turned on
8. That's it! Go to your Contacts app and before long you should see your contacts appear.
You're all synced! Go have some ice cream to celebrate.
For extra credit:
If you want to sync more than one calendar with your phone, go to https://www.google.com/calendar/syncselect while on your phone
If you use Google Apps for Business, then (again, on your phone) go to https://www.google.com/calendar/hosted/business_name/syncselect where "business_name" is the domain you use for your Google Apps account
All done! Celebrate with a little dance. You deserve it.
Sign up to receive updates in your inbox